
Ironing clothes is an essential part of maintaining their appearance and ensuring a crisp and polished look. An iron is a handy home appliance that helps to remove wrinkles and creases from clothes, thus giving them a neat and professional appearance. Investing in a good iron is crucial, as the way you dress can be a reflection of your personality. Crisp clothes show your attention to detail, and a neat, clean, and well-ironed outfit can go a long way in projecting your persona.
Basically, an iron removes wrinkles from washed clothes, so that they are “as good as new”, or at least smooth out most of the wrinkles they have, due to washing and drying. A clothes iron is a household appliance used to press the wrinkles out of and creases into clothes. The combination of heat and pressure removes wrinkles.
How Electric Irons Work
An electric iron is an application of the heating effect of current. Current is taken from the power supply which heats up the coil inside the iron, and this heat is then transferred to the soleplate due to conduction. When it’s rubbed on clothes, small strings of clothes stretch to go flat. An electric iron might not remove creases when it’s too cold, and cloth might burn when it’s too hot, so there is a range of temperature in which an electric iron operates effectively. Domestic irons generally range in operating temperature from between 250 °F (121 °C) to 360 °F (182 °C).
Modern steam irons heat up very quickly and allow you to reduce ironing times, thanks to the high power and the quality and quantity of the steam produced.
Types of Electric Clothes Irons
There are basically two types of electric irons:
Automatic Irons
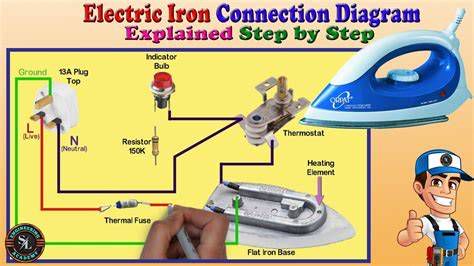
- It’s a thermostat switch to regulate the heat to a predetermined value. When the predetermined value of the temperature is reached, the thermostat switch automatically disconnects the electricity supply and reconnects the same when iron starts cooling down.
- It has a pilot lamp to indicate. It will glow if the temperature is under a predetermined value, otherwise not glow.
- Cost is high.
- As the temperature is controlled automatically through a thermostatic switch, the risk of burning the cloth is minimized.
Non-Automatic Irons
- It does not contain a thermostat switch. Thus, temperature is not regulated.
- User has to switch ON or OFF the supply to iron according to the heat requirement.
- There is no pilot lamp to point out the temperature condition whether it is within the limit or not.
- Cost is low.
- Overheat might burn the cloth. Thus, more care is needed.
Automatic electric irons are more common as compared to non-automatic due to their safety benefits.
Components of an Electric Iron
An electric clothes iron has the following common parts:
- Handle: The handle of an electric iron is made with plastic or wood. The reason is that these materials are insulators; current doesn’t pass through them, so a person who touches the handle while ironing would be saved from getting shocked. It’s attached to the cover plate with the aid of screws.
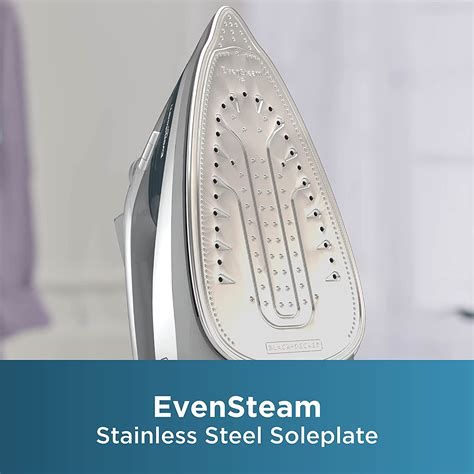
- Soleplate: Soleplate, also called the hot plate, is the thick and flat triangular shaped surface made of aluminum that forms the base over which the electric iron is built up. Aluminum allows corrosion not to occur. It is polished, layered with a non-stick material making it stainless. It’s the part of an electric iron which comes in contact with clothes while ironing. The base plate holds the pressure plate and cover plate in position.
- Cover Plate: The cover plate is made of thin sheet of iron. It is placed on top of the base plate and it covers all the internal parts of the iron. The handle and connector are only attached to the cover plate.
- Pressure Plate: This plate is generally called the top plate as it follows the shape of the soleplate. The pressure plate has some holes through which the studs form the base plate passes through. We should tighten the nuts on the studs in such a way that the pressure plate and soleplate are pressed tight against each other. In some irons, the pressure plate is heavy and made of cast iron, while in some other cases, it is a thin sheet of steel, about ¼ cm thick.
- Pilot Lamp: The pilot lamp is housed on the cover plate of the electric iron. One end of the pilot lamp is connected to supply, while the other end is connected to the heating element. A shunt resistance is provided across the pilot lamp which assists in providing a voltage drop. The shunt is designed to provide a voltage drop of 2-5 volts.
- Heating Element: Most heating elements are made with a nickel-chromium wire, having both tensile strength and high resistance to current flow. In an electric iron, the heating element is present between the soleplate and pressure plate. It is pressed hard between the two plates. The heating element consists of nichrome wire wound around a sheet of mica. The two ends of the nichrome wire are connected to the contact strips. The contact strips are connected to the terminals of the iron. There are two reasons for which mica is chosen in the heating material: Mica is a very good insulating material, and it can also withstand very high temperatures. The entire assembly of mica sheet, nichrome wire and contact strips are riveted together resulting in a mechanically sound and robust construction. There is an asbestos sheet, which separates and thermally insulates the top plate from the heating element.
- Thermostat: Thermostat is an important component of an electric iron that regulates its temperature. The main function of the thermostat in an electric iron is to make sure that the iron doesn’t get too hot if it is left unattended to for a period of time. When electric current is passed through a coil in an electric iron, the coil becomes very hot. Through conduction, the heat is transferred to the flat base plate of the electric iron which is used to iron our clothes. However, the heating element continues to get hotter so far there is continuous drawing of electricity from the power supply. This result into a lot of energy wastage, clothes ruin and in the worst scenario, cause a nasty accident. At this point, the thermostat comes in because it is important that the iron doesn’t heat up to a temperature that is hazardous. The thermostat in iron makes use of a bimetallic strip. This bimetallic strip is made up of two different types of metals (Brass and iron) with different coefficient of expansion bonded together. Therefore, in the presence of heat, the bimetallic strip expands differently. The metallic strip is connected to a contact spring through small pins. The bimetallic strip remains in physical contact with the contact point at moderate temperature. However, at a temperature of the iron above a certain limit, the strip tends to bend towards the metal with a lower coefficient of expansion. At this point, the strip stops to be physically connected to the contact point and current stops flowing because of opening of the circuit. As far as the circuit remains open, the temperature of the iron continues to reduce, then the strip goes back to its original position and current begins to flow again. This cycle continues until the power supply is being switched off from the main electricity source. This is the main reason why your iron tends to power on and off on its own when connected to an electric source.
- Capacitor: The thermostat helps in maintaining the temperature within limits. But frequent making and breaking of the circuit damages the contact points and it may also result in interference with radio reception. To avoid this, a capacitor of a certain range is connected across the two contact points.
Types of Clothes Irons
Many varieties of iron for clothes are currently available, and they will help you make a sensible choice depending on your particular needs.
Dry Irons
Dry irons are traditional irons that use heat and pressure to remove wrinkles from clothes. They are the simplest and the most traditional kind of irons for clothes. They are simple to use and usually cost less than steam irons. Dry irons are suitable for everyday ironing needs and are particularly useful for delicate fabrics that require gentle heat. They are effective in removing wrinkles, especially on silk and other fabrics that need extra care. Dry irons are generally lightweight, making them easy to use. This feature is beneficial, especially when ironing a large number of clothes.
They come with different types of soleplate coatings such as Teflon, American Heritage and Gold. These coatings improve the iron's glide over fabrics and ensure even heat distribution. The non-stick coating on the soleplate reduces sticking and makes gliding the iron over the fabric easier. It is scratch-resistant and helps deliver even heat distribution. The power wire is typically a 360-degree swivel cord that allows for increased flexibility when using the iron. Dry irons have different fabric settings to adjust the temperature to a suitable level for specific fabrics. This setting also helps prevent damage to delicate fabrics and ensures the best possible ironing results. Also, dry irons can be either lightweight or heavyweight. Heavyweight irons typically feature a heavy metal plate that can retain heat for longer.
Come funzionano i ferri da stiro - Design ingegnoso di un ferro da stiro elettrico
Steam Irons
Steam irons moisten the fabric, making it easier to remove wrinkles. They can also be used vertically to freshen up clothes without ironing them. Steam irons are currently the best known of irons for clothes. They blend heat and steam to soften up fibers of fabric, enabling wrinkle removal to be made easier. A steam iron is an appliance that is used to iron clothes and remove wrinkles from the clothes. It works by heating up a metal plate and emitting steam through small holes in the plate. The steam helps to relax the fibres in the fabric, making it easier to smooth out wrinkles. When you iron with steam, it is easier to remove wrinkles than traditional dry irons because the steam helps to penetrate the fabric more deeply.
Similar to dry irons, steam irons also have different types of soleplate coatings such as Teflon, American Heritage, and Gold. They usually have adjustable steam settings that allow you to control the amount of steam released during ironing. This feature is helpful for different types of fabrics. Additionally, they come with an automatic shut-off feature. Such irons can be used vertically to freshen up hanging clothes, curtains or upholstery without the need for a traditional ironing board. Some steam irons also have a feature called a "steam boost" which allows for a strong burst of steam to be released for more stubborn wrinkles.
Pressurized Steam Generator Irons
A pressurized steam generator iron is a type of steam iron that uses a separate water tank and heating element to generate steam, rather than a traditional iron that generates steam from the iron itself. Pressurized steam generator irons tend to be larger and more powerful than traditional steam irons, and they are designed to produce a higher volume of steam. Pressurized steam generator irons tend to be more expensive than traditional steam irons, but they may be more efficient and effective at removing wrinkles.
Garment Steamers
A garment steamer is a device that uses steam to smooth and remove wrinkles from clothing, upholstery, and other fabrics. It does not require a pressing surface and can be used to deodorize and freshen fabrics as well. To use a garment steamer, you simply fill the device with water, wait for it to heat up, and then run the steamer head over the fabric you want to treat. The heat and moisture from the steam help to relax the fibres in the fabric and smooth out wrinkles. A garment steamer is not an alternative to a Steam iron, rather an addition to your ironing tools for last-minute outfit touch-ups and crease-less ironing. Vertical steamers are a special kind of cloth ironing that puts out the steam non-stop to dewrinkle without touching the fabric.
Philips also has a range of garment steamers or iron steamers - both handheld steamers and Standing Steamer irons.
Other Specialized Irons
- Travel irons: Travel irons are lightweight, portable irons meant for travelling.
- Cordless irons: Cordless irons operate off rechargeable bases such that movement is free from cord restrictions.
Benefits of Ironing Clothes
Ironing clothes has several benefits that can enhance the appearance and extend the life of your favorite garments. One of the primary advantages of ironing is its ability to remove wrinkles and creases from clothing, resulting in a crisp and well-groomed appearance. Ironing helps smooth out the fabric, leaving it looking fresh and presentable.
Beyond improving your clothing’s appearance, regular ironing can also extend the lifespan of your favorite garments. Regularly ironing your clothes can help prevent the formation of deep wrinkles that can lead to permanent creases or fabric damage. Ironing the fabric preps it and makes it more receptive to stain removers. The heat and pressure from ironing can help open up the fabric’s fibers, allowing stain removers to penetrate more effectively and lift stains from the fabric.
Ironing Techniques and Fabric Care
Different types of fabrics require specific care and attention when ironing to avoid any damage. When it comes to ironing different fabrics, it is important to consider their heat tolerance and texture. It is essential to pay attention to the care labels to determine the appropriate heat setting for each garment. Improper ironing can weaken the delicate fibers of silk, resulting in permanent damage. Always be mindful of the care instructions on the tag to avoid damaging your clothing and garments. The temperature you should use depends on the fabric. Every fabric has a different heat tolerance, so be sure to follow the instructions on the care tag to prevent damaging your clothes.
Temperature Settings for Various Fabrics
When exposed to the iron for too long, heat-sensitive materials may experience issues, including discoloration, melting, or scorching.
| Temperature Setting | Fabric Type | Notes |
|---|---|---|
| Low-temperature (Cool setting) | Acetate, acrylic, nylon | These fabrics are sensitive to heat and may melt or distort if ironed at high temperatures. No steam should be used to iron nylon. |
| Medium-temperature (Warm setting) | Polyester, silk, satin, wool | These fabrics can tolerate moderate heat but may still be prone to damage if ironed at high temperatures. Delicate fabrics like silk, satin or chiffon require extra care as they can easily scorch or get damaged by high heat. Silk is a delicate fabric therefore you should be careful about the type of iron you use. |
| High-temperature (Hot setting) | Linen, cotton, denim | These fabrics are more robust and can withstand higher heat levels. For medium-weight fabrics such as cotton, linen or denim, a moderate to high heat setting can be used. These fabrics are more resistant to heat and can withstand a higher temperature. You need high heat to successfully iron cotton clothes. Linen fabric tends to wrinkle relatively quicker, hence you need high heat to iron linen clothes. |
Using Starch Spray
Starch spray can be helpful when ironing certain types of clothing. The starch spray provides additional stiffness and structure to fabrics, resulting in a crisper and more polished appearance.
- Formal or business attire: Starch spray is helpful when ironing formal or business attire, such as dress shirts, blouses, or trousers.
- Thin or lightweight fabrics: Thin or lightweight fabrics, such as linen or cotton blends, can benefit from starch spray.
Remember, using a starch spray is a personal preference, and not all garments require it. Some people prefer a softer and more natural drape to their clothes, while others prefer a crisper appearance.
Step-by-Step Ironing Process
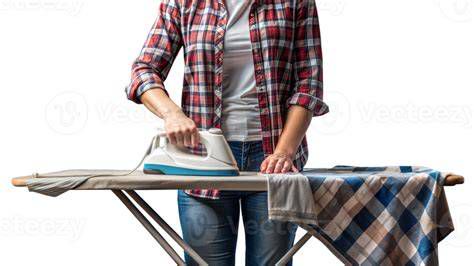
If you want to master the art of ironing, we’ve got you covered! The first thing you need to do is place your ironing board on a flat, sturdy surface and ensure it is at a comfortable height for you to work. Next, fill the water reservoir of your iron with distilled water if it has a steam function. For most garments, it’s best to iron them inside out to prevent any potential damage to the outer surface or prints. To iron your clothes, place the garment flat on the ironing board and start with the collar or neckline. Continue ironing section by section, smoothing out wrinkles and creases as you go. If your iron has a steam function, use it to help remove stubborn wrinkles.
Ironing pants is an essential skill that can elevate your overall appearance and leave you looking sharp and well-dressed. Whether you’re preparing for a business meeting or just want to maintain a polished look, knowing how to iron pants properly is essential. Empty the pockets and close any zippers or buttons. Begin with the waistband, placing it flat on the ironing board. Gently iron over it, moving back and forth until it is smooth. Next, iron the legs: begin with one leg, laying it flat on the ironing board with the seams aligned. Start at the top and work your way down, using the iron to smooth out any wrinkles. Be mindful of creases and cuffs, and iron them carefully. Iron pleats carefully to maintain their shape.
Choosing the Right Iron
Choosing the types of iron for clothes is not just about eliminating wrinkles, but rather how to take care of your clothes correctly, prolonging their period. With technological development, modern irons have features to enable them to work in responding to different types of fabrics and avoiding wrecking them. Investing in the right iron for clothes is much more than convenience - it will affect your clothes’ appearance and longevity. Quality irons heat fabrics evenly thus they remove wrinkles without damaging it. Time efficiency is another important advantage of an appropriate iron. High performance models take time to warm up and if you can keep a consistent temp it takes less time on ironing tasks.
For selecting the iron, you must consider things like the frequency of ironing, diversity of fabric, place to store such things, and budget. Consider the weight of the iron. Fit for all purpose is the mid-weight iron (1-4 kg). Know the power and wattage of the iron you want to use. Suggest 1400-1800 watts irons for good heating. A mid-range iron with enough features is usually a more valuable product than a high-end iron that offers everything that you will never use. Investing in the right iron not only enhances the outcome but it also keeps your clothes in good shape while preserving their quality and appearance.
Crompton offers two types of irons: dry irons and steam irons. Crompton dry irons come with various soleplate coatings like Teflon, American Heritage and even Gold for improved glide and even heat distribution. Crompton steam irons have different soleplate coatings and adjustable steam settings. They also feature automatic shut-off for safety and energy efficiency. Crompton offers a range of electric irons with various features. These include models like FabriAutotech, FabriSmart, Pyro, FabriMax, Rhino Plus, FabriMagic and Presto. Philips has a range of steam irons and dry irons in its range. You can buy Philips Steam iron at a home appliance store near you or you can buy steam iron online at the Philips Home Appliance Store and the top e-commerce sites like Amazon and Flipkart.
History of the Clothes Iron
Though objects have been used for thousands of years to remove wrinkles and/or press clothing, for much of that time only the wealthy had their clothes so treated. Because the use of such implements was hard and laborious, only the rich could afford to employ people (usually slaves or servants) to do the work. In about 400 b.c., Greeks used a goffering iron to create pleats on linen robes. The goffering iron was a rolling pin-like round bar that was heated before use.
Empire-era Romans had several tools similar to the modern iron. One was a hand mangle. This flat metal paddle or mallet was used to hit clothes. The wrinkles were removed by the beating. Another implement was a prelum. This was made of wood and not unlike a wine press. Two flat heavy boards were put between a turnscrew, also made of wood. Linen was placed between the boards and the increasing pressure applied by the turnscrew created pressure to press the fabric.
The ancient Chinese also had several primitive types of irons, including the pan iron. The pan iron looked rather like a large ice cream scoop. This iron had an open compartment with a flat bottom and a handle. The compartment held hot coal or sand, which heated the bottom of the pan iron. It was moved across clothing to remove wrinkles.
By about the tenth century A.D., Vikings from Scandinavia had early irons made of glass. The Vikings used what was called a linen smoother to iron pleats. The mushroom-shaped smoother was held near steam to warm up, and was rubbed across fabric.
What contemporary consumers would recognize as an iron first appeared in Europe by the 1300s. The flatiron was comprised of a flat piece of iron with a metal handle attached. To heat the iron, it was held over or in a fire until it was hot. When a garment was pressed with the flatiron, it was picked up with a padded holder. A thin cloth was placed between the garment and the iron so that soot would not be transferred from implement to the finished garment. The flatiron was used until it was too cool to do its job. Many people owned several flatirons so they could heat one or more while one was being used.
In approximately the fifteenth century, an improvement over the flatiron was introduced: a metal box with a smooth bottom and a handle. Inside, hot coals, bricks, slugs (heated metal inserts) or some other heating element were placed. This eliminated the need for an extra cloth between clothing and iron because the iron did not get the clothes dirty. Both the flatiron and hot box were used for several hundred years.
Many innovations in iron technology came in the nineteenth century. When cast iron was invented in the early part of the nineteenth century, some of the problems with flatirons were solved. With the advent of cast iron stoves, flatirons could be heated on top of them, which was much cleaner than a fire. By the 1820s, cast iron was also used to make flatirons. These irons were called sad irons because they were heavy, weighing about 15 lb (5.6 kg), and hard to move.
Like flatirons, sad irons were heated on the stovetop, but they sometimes heated unevenly. The handle also heated up, which posed problems for users. American Mary Potts solved these predicaments in 1870. She made a cardboard base and filled it with plaster of Paris. This was placed around the iron's body and kept it cooler for more even heating. Potts also devised a detachable wooden handle that was spring loaded for the sad iron. Because wood does not hold heat in the same way that iron does, the person using the iron would not be burned.
After gas became available in American homes in the late 1800s, gas irons came into existence. The earliest were patented in 1874. Homes had individual gas lines into them, and the gas iron was hooked up to the gas line by a pipe. The iron contained a burner to which the gas flowed. When the burner was lit with a match, the iron heated up. The iron was very hot and gas sometimes leaked, but the gas irons were lighter than sad irons. Other fueled irons soon followed. These irons were heated with oil, gasoline, paraffin, and other fuels.
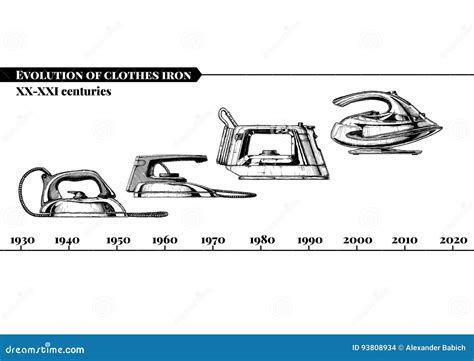
The electric iron was invented in the 1880s when electricity became widely available in homes. The first electric iron was patented by Henry W. Seeley in 1882. His iron was hooked up to an electrical source by detachable wires. The electricity stimulated the iron's internal coils. But Seeley's iron, like many early electric irons, did not have electric cords. The irons were heated on a stand. One big problem with Seeley's iron was that it heated very slowly on the stand, and cooled quickly while in use. This iron had to be reheated frequently.
By the turn of the century, iron technology had progressed considerably and irons became more common in American households. In 1903, irons with electric cords directly attached to the iron were being sold. Earl Richardson invented a sole plate (the bottom part of the iron that is made of metal and does the actual pressing) that improved how and where sole plates were heated for better ironing. His iron had more heat in the tip than in the center and was known as the Hotpoint.
In the 1920s, Joseph Myers improved the iron and cord by adding an automatic heat control made of pure silver. Thermostats soon became a standard feature. The first cordless irons were introduced in 1922, though they did not catch on. (The first successful cordless irons were sold in 1984).
In 1926, the steam iron was introduced by the Eldec Company. Steam made it easier to smooth dry stiff fabrics. Previously the user sprinkled water on dry clothing, or clothing had to be ironed when damp. The steam irons employ a water tank that allows heated water vapor to be created and applied through small holes on the sole plate. Steam irons did not become popular until the 1940s. Edward Schreyer conquered the problem of rusting sole plates in 1938. He developed an aluminum alloy that would not rust or leak. Irons that could vary between steam or dry were introduced in the 1950s. The first iron with automatic shut off was introduced in 1984. Contemporary irons have nonstick coating on the sole plate, an innovation that was introduced in 1995.
Raw Materials and Manufacturing Process
Raw Materials
Irons are made primarily of plastic and metal (aluminum and steel). The materials often come to the factory in the form of plastic resins, aluminum ingots, and steel sheets. The metal is used to make the sole plate, thermostat and other internal mechanisms. Plastics are used to make the exterior and handle, as well as the water tank. Certain components, like the spring for the thermostat, cord, plug, and related connections are usually outsourced by iron companies.
Manufacturing Process
First, each sub-assembly of the iron is produced, most often on separate, automated production lines. Then the iron is assembled.
Soleplate Manufacturing
- The sole plate is cast of molten aluminum. Part of the mold creates the holes that are essential in a steam iron. Heated metal is inserted into a mold under pressure, cooled, and released.
- The cooled sole plate is treated in one of three ways: It is polished, coated with a non-stick PTFE material, or covered with another metal, such as stainless steel. To complete one or more of these processes, the sole plates are put on a large automated carousel, which rotates through each step.
- To polish the plate, an automated belt sander uses bands of abrasive to polish and buff the plate. The finish required determines which grade of abrasive is used.
- An automated spray-painting machine applies non-stick coating. After application, the sole plate is baked in an automated industrial process.
- To coat with another metal, the external metal cover is created by an automated stamp press. The resulting cover is either pressed or riveted onto the sole plate, through a smaller machine press.
Thermostat Manufacturing
- In an injection mold, a small metal post is cast.
- A spring is mounted onto the metal post. This spring is a bimetallic switch made of two different metals with divergent linear thermal coefficients bonded together. The spring actually controls the iron's temperature.
- Power contacts are attached to the end of the spring, which let the electricity through so the iron can be heated. This whole process is generally automated.
Water Tank Manufacturing
- In a two-part injection mold, heated plastic is inserted to make upper and lower sections of the tank. Several openings on the tank are created as part of the mold.
- The mold is put under pressure, cooled, and released as a one-part tank.
- Other parts for the tank (pump, internal chamber, piston, buttons, and other parts) are created by similar injection molding processes.
- On an automated assembly line, the parts are put together, with each of the other parts put onto the water tank.
Housing and Handle Manufacturing
- In an injection mold, heated plastic is inserted into a mold under pressure, cooled, and released to create the housing.
- Similarly, in an injection mold, heated plastic is inserted into a mold under pressure, cooled, and released to create the handle.
Assembly
When all the parts are manufactured, the iron is assembled on an automated assembly line.
- The sole plate is the first part on the assembly line. The thermostat is either screwed onto the plate, or welded to the plate by a robot.
- To the sole plate-thermostat subassembly, the water tank is put in place. It is secured on an automated line with screws or other industrial fasteners.
- The handle and body are attached over the sole plate, thermostat and water tank, and fixed by screws. Sometimes this process is automated, but it also can be done manually.
- The electrical cord is the last piece to be added. Sometimes this process is automated, but it also can be done manually.
- After an automated testing process, the irons are inspected by hand.
- Completed irons are packed into individual boxes with instructions and other documents by hand. (For some companies, this is an automated process.)
- The individual boxes are placed in shipping cartons or master packs for distribution to warehouses.
Quality Control and Waste Management
Before the manufacturing process begins, all the raw materials are sample checked for consistency. As each subassembly of the iron is manufactured, the pieces are checked for correct functionality. During the assembly process, an iron is removed from the production line and taken apart by an independent department to look for errors. Any mistakes result in the whole batch of irons being checked and corrected if necessary. After the product is assembled, a worker also checks the iron for electrical functionality and water integrity.
Any excess metal or plastic from the molding process is reused in the process, if possible. Anything that is unable to be used is recycled.